Table of Contents
Synology: Import wildcard certificate from pfSense plus certificate renewal automation with Tux
 Did you ever wonder how you can import pfSense's wilcard certificate into your Synology NAS and set up an automated certificate renewal process?
Hey, my name is "Tux" and this tutorial will show you how you can avoid using Synology's limited wildcard certificate service and how to take advantage of a centralized, fully automated wildcard certificate renewal management when using the acme package within pfSense.
First thoughts
Note
- Synology DSM 7.0.1
- Netgate pfSense 2.5.1 with ACME 0.6.9_3 package
Important note!
Please be aware that a default wildcard certificate
*.myDomain.com, created by Let's Encrypt certificate service (which pfSense's acme package is using) does only cover the domain including its prefixes such as www.myDomain.com
mail.myDomain.com
wiki.myDomain.com
and so on, but not the main domain itself such as
myDomain.com
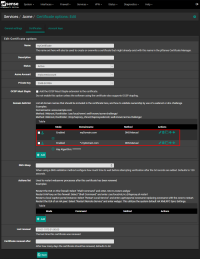
If you want to cover all domain prefixes including the main domain itself (which I'd highly recommend!), you have to add just both entries on the according certificate inside pfSense's acme package as shown below:
In addition please be aware that no matter which official CA you are using, in most cases *.myDomain.com also does not cover multiple domain prefixes exceeding a domain's 3rd-level-label such as
www.wicked.myDomain.com
server1.mail.myDomain.com
doku.wiki.myDomain.com
Additionally this tutorial assumes you have set up SSH root-access with public authentication key from pfSense to your Synology NAS for automated and unattended access. If you have not set up this already, please do it by referring to this tutorial first and then to this tutorial.
Please note that this tutorial also assumes you have your Synology NAS up and running 24/7. Otherwise a reliable automated certificate renewal process cannot be guaranteed.
Start of tutorial
As you are aware of the information box above we move to practice now.
Let's begin!
Step 1: Initial certificate export/import
First, login into your pfSense web interface and navigate to:
System → Cert. Manager → Certificates
From here, as shown on the screenshot below, you have to export your certificate file (1) and the according public key file (2) temporarly onto your local computer:
Now you should have the following two files stored on your local computer:
<myDomain>.cer<myDomain>.key
Now login into your Synology NAS' web interface. From there do the following steps to import the exported certificate files:
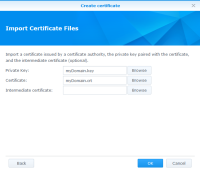
Control Panel → Security → Certificate → Add → Choose Add a new certificate → Next → Choose Import certificate → Next → On Private Key: click on Browse and choose the <myPrivateKey>.key file from your local computer. On Certificate: click on Browse and choose the <myCertficate>.cer file from your local computer. Leave Intermedia Certificate: empty. → OK
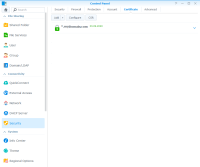
Your certificate should now show up similar to this:
Now click on Settings and select the according imported certificate for every single application as required from the according dropdown menu.
Then click on OK.
Now open a terminal on your local computer and SSH with root user into your Synology NAS by executing:
$ ssh -p "<mySynologySSHPort>" root@<mySynologyIPAddress>
From there, execute the following command to navigate to the directory where Synology DSM stores all its certificates:
$ cd /usr/syno/etc/certificate/_archive/
Now execute:
$ ls -l
Any certificate installed on your Synology NAS holds its own directory named by a string containing six random characters similar to H6QDpY. So if you have multiple certificates installed on your Synology NAS, therefore multiple directories will show up. To check which one holds the recent imported certificate, just check the according creation date which matches the time you have imported the certificate:
Important step: Now for further steps (and to make your life easier in the future) you have to add this cryptic directory name to the description of your certificate manager within the Synology DSM GUI (also, this way you always know which cyrptic certificate directory name belongs to which of your domain certificates, especially helpful when you have more than a single certificate on your Synology DSM system):
Control Panel → Security → Certificate → Right click the according certificate → Edit → Within the Description: input mask enter the according cryptic foder name → OK
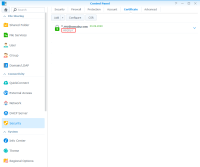
Now your certificate description entry should be made and should look similiar to this:
Now back to the command line:
cd into that specific certificate directory…
$ cd <myCertificateDirectory>/
..and execute a list command again:
$ ls -l
As you can see there are the following three files stored inside the directory:
cert.pemfullchain.pemprivkey.pem
Note that the original files were fully renamed to static names (yes, the files were just renamed and not converted as the original files were already formatted as ASCII code), the file type changed to .pem and there is even an additional file called fullchain.pem being created automatically by Synology DSM's certificate import process.
Now the initial certificate import/export process has finished. Now you should configure your imported certificate to bind it to the according services you are using on your Synology NAS:
Control Panel → Security → Certificate → Settings → Configure everything the way you need it → OK
Now you already have a working wildcard certificate on your Synology NAS but unfortunately, unlike your pfSense's automated certificate renewal process, there is no such automated process existing on your Synology NAS yet.
We'll change that.
Step 2: Synology scripts and configuration
To accomplish an automated certificate renewal process on your Synology NAS you now have to create the accoring environment on your Synology NAS by command line interface.
Unfortunately it is not enough to just replace the updated certificate files on your Synology NAS after a certificate renewal process has been executed on your pfSense system. Therefore, to just copy over the new certificate files would not be a solution that would work. If you'd dive a little deeper into looking for a reason, you'll notice the following INFO file which its content holds the answer you are looking for:
$ cat /usr/syno/etc/certificate/_archive/INFO
You can see now that Synology DSM is using this file to store its information about which certificate is assigned to which application(s). Of course you could adjust every single entry manually but thanks to this guy you can just use a script for that (we'll get to that in a minute). The script is searching/replacing the according certificate by using the description tag desc inside the INFO file (which is the description we have set previously set on the according certificate as you may remember).
Now let's move on and follow further steps.
Create a script file called update-cert.sh…
$ vi /usr/syno/etc/certificate/_archive/update-cert.sh
…and paste the following content (don't change anything, just copy and paste!):
#!/bin/bash

UPDCERT_USAGE="Usage: ./update-cert CERT_NAME [--by-id]"

CERTS_ROOTDIR=/usr/syno/etc/certificate/_archive/certs
CERT_NAME=$1
CERT_FILES=(cert.pem fullchain.pem privkey.pem)

if [ -z $CERT_NAME ]; then
  echo $UPDCERT_USAGE
  exit -1
fi
if [[ ( -n $2 ) && ( $2 != --by-id ) ]]; then
  echo $UPDCERT_USAGE
  exit -1
fi

CERT_DIR=${CERTS_ROOTDIR}/$CERT_NAME

for CERT_TARGET_DIR in $(python get-cert-dirs.py $CERT_NAME $2); do
  for CERT_FILE in ${CERT_FILES[@]}; do
    eval "cp ${CERT_DIR}/$CERT_FILE ${CERT_TARGET_DIR}/$CERT_FILE"
	eval "chown root:root ${CERT_TARGET_DIR}/$CERT_FILE"
	eval "chmod 600 ${CERT_TARGET_DIR}/$CERT_FILE"
  done
  echo
done
Save the file and quit the editor.
Now create a script file called get-cert-dirs.py…
$ vi /usr/syno/etc/certificate/_archive/get-cert-dirs.py
…and paste the following content (don't change anything, just copy and paste!):
#!/usr/bin/env python

usage = "./get-cert-dirs.py CERT_NAME [--by-id]"

system_dir = "/usr/syno/etc/certificate"
pkg_dir = "/usr/local/etc/certificate"
archive_dir = system_dir+"/_archive"
info_path = archive_dir+"/INFO"

import sys
import json

def parse_info(cert_name, by_description=False):
    certs = json.loads(open(info_path).read())
    if by_description is True:
        cert_id = None
        for key in certs.keys():
            if certs[key]['desc'] == cert_name:
                cert_id = key
                break
        if cert_id is None:
            return None
    else:
        cert_id = cert_name
    try:
        cert_info = certs[cert_id]
    except KeyError:
        return None

    paths = ["\"{}/{}\"".format(archive_dir, cert_id)]
    for service in cert_info['services']:
        root_dir = pkg_dir if service['isPkg'] is True else system_dir
        path = "\"{}/{}/{}\"".format(root_dir, service['subscriber'], service['service'])
        paths.append(path)

    return paths

if __name__ == "__main__":
    wrong_usage = False
    args_num = len(sys.argv) - 1
    if args_num < 1:
        wrong_usage = True
    elif args_num == 2 and sys.argv[2] != "--by-id":
        wrong_usage = True
    elif args_num > 2:
        wrong_usage = True
    if wrong_usage is True:
        print("Usage: "+usage)
        sys.exit(-1)
    cert_name = sys.argv[1]
    by_description = True if args_num == 1 else False
    dirs = parse_info(cert_name, by_description)
    if dirs is not None:
        print(" ".join(dirs))
Save the file and quit the editor.
Now make both scripts executable:
$ chmod +x /usr/syno/etc/certificate/_archive/update-cert.sh
$ chmod +x /usr/syno/etc/certificate/_archive/get-cert-dirs.py
Now create the according directory, needed for the scripts.
Note: It is important to replace <myCertificateDescription> with the description text you have set on the certificate import process. The description text has to match the according directory name and is case sensitive!)
$ mkdir -p /usr/syno/etc/certificate/_archive/certs/<myCertificateDescription>
Step 3: pfSense script and configuration
Now, from your local computer, SSH with admin user into your pfSense system. From there, create the following directory:
$ mkdir ~/scripts
Now, inside that directory, you have to create a script file, which will copy the required certificate files unattended and immediately whenever they are being updated automatically by pfSense's acme package. Just create the script and give it a proper custom name <mySciptFile>.sh (I called mine copy<myDomain>CertsToSynology.sh):
$ vi ~/scripts/<mySciptFile>.sh
Now paste the following content and adjust the according place holders (please note, as already mentioned previously, the following script does not have to convert any of the files before copying over because the original files are already coded as ASCII, therefore some simple file renaming commands will do the job right):
Beware: The last script line will reboot your Synology NAS immediately! If you don't want your Synology NAS to get rebooted, read the Important notes! section box below!
#!/bin/sh
#
# Copy certificate files to temporary directory on Synology NAS:
scp -P <mySynologySSHPort> /conf/acme/<myCertificate>.crt root@<mySynologyIPAddress>:/usr/syno/etc/certificate/_archive/certs/<myCertificateDescription>/cert.pem
scp -P <mySynologySSHPort> /conf/acme/<myCertificate>.key root@<mySynologyIPAddress>:/usr/syno/etc/certificate/_archive/certs/<myCertificateDescription>/privkey.pem
scp -P <mySynologySSHPort> /conf/acme/<myCertificate>.fullchain root@<mySynologyIPAddress>:/usr/syno/etc/certificate/_archive/certs/<myCertificateDescription>/fullchain.pem
#
# Update certificate on Synology NAS remotely:
ssh -p <mySynologySSHPort> root@<mySynologyIPAddress> "sudo /usr/syno/etc/certificate/_archive/update-cert.sh '<myCertificateDescription>'"
#
# Delete temporary certificate files:
ssh -p <mySynologySSHPort> root@<mySynologyIPAddress> "rm -rf /usr/syno/etc/certificate/_archive/certs/<myCertificateDescription>/*"
#
# Reboot Synology NAS:
ssh -p <mySynologySSHPort> root@<mySynologyIPAddress> "sudo reboot now"
Important notes!
Restarting services
Instead of…
# Reboot Synology NAS:
ssh -p <mySynologySSHPort> root@<mySynologyIPAddress> "sudo reboot now"
…your last script line(s) could look similiar to:
# Restart "nginx" webserver:
ssh -p <mySynologySSHPort> root@<mySynologyIPAddress> "/usr/syno/bin/synosystemctl restart nginx"
#
# Restart "Apache" webserver:
ssh -p <mySynologySSHPort> root@<mySynologyIPAddress> "/usr/syno/bin/synosystemctl restart pkg-apache24.service"
#
# Restart "Synology Webstation":
ssh -p <mySynologySSHPort> root@<mySynologyIPAddress> "/usr/syno/bin/synosystemctl restart pkgctl-WebStation.service"
#
# Restart "Synology Contacts":
ssh -p <mySynologySSHPort> root@<mySynologyIPAddress> "/usr/syno/bin/synosystemctl restart pkgctl-Contacts.service"
#
# Restart "Synology Calendar":
ssh -p <mySynologySSHPort> root@<mySynologyIPAddress> "/usr/syno/bin/synosystemctl restart pkgctl-Calendar.service"
#
# Restart "Synology Note Station":
ssh -p <mySynologySSHPort> root@<mySynologyIPAddress> "/usr/syno/bin/synosystemctl restart pkgctl-NoteStation.service"
#
# Restart "Synology Mail Server":
ssh -p <mySynologySSHPort> root@<mySynologyIPAddress> "/usr/syno/bin/synosystemctl restart pkgctl-MailServer.service"
#
# Restart "Synology Mail Station":
ssh -p <mySynologySSHPort> root@<mySynologyIPAddress> "/usr/syno/bin/synosystemctl restart pkgctl-MailStation.service"
#
# Restart "Synology Chat":
ssh -p <mySynologySSHPort> root@<mySynologyIPAddress> "/usr/syno/bin/synosystemctl restart pkgctl-Chat.service"
#
# Restart "Synology Drive":
ssh -p <mySynologySSHPort> root@<mySynologyIPAddress> "/usr/syno/bin/synosystemctl restart pkgctl-SynologyDrive.service"
#
# Restart "Synology Surveillance Station":
ssh -p <mySynologySSHPort> root@<mySynologyIPAddress> "/usr/syno/bin/synosystemctl restart pkgctl-SurveillanceStation.service"
#
# Restart "Synology Photos":
ssh -p <mySynologySSHPort> root@<mySynologyIPAddress> "/usr/syno/bin/synosystemctl restart pkgctl-SynologyPhotos.service"
#
.
.
.
Setting a reboot timer
23:59) you are free to add the following script code right before the reboot command:
while [ $(date +%H:%M) != "<myRebootTime>" ];
	do sleep 1;
done
Example:
.
.
.
#
while [ $(date +%H:%M) != "23:59" ];
	do sleep 1;
done
#
ssh -p <mySynologySSHPort> root@<mySynologyIPAddress> "sudo reboot now"
In general please feel free to adjust the script according to your requirements!
Save the file and quit the editor.
Now make the script executable:
$ chmod +x ~/scripts/<mySciptFile>.sh
Almost finished now! The very good news is on pfSense's acme package which allows you to execute any desired script immediately after an acme certificate renewal process. On pfSense's web interface do:
System → Cert. Manager → Certificates → Click the edit button on <myCertificate> → Scroll down to Actions list, click + Add and enter the path to your script as shown below:
Click on Save and you're done! To test the functionality you want to start a certifiacte renewal process manually:
On pfSense's web interface navigate to:
Services → Acme certificates → Click on Renew by the according certificate
Final notes!
- If you have multiple domains for which you want to automate the certificate renewal process just use a script per domain. You should avoid puttig all together in one script which makes management easier in my personal opinion.
- Please remember to backup all of your customized scripts in case you need so set up this environment again for whatever reason!
End of tutorial
Appreciate my work?
Buy me a coffee  or PayPal
Source(s):
English Synology forum
German Synology forum


