Table of Contents

Proxmox: Migrating VMware VCSA to Proxmox with Tux
 Hey, my name is "Tux" and in this tutorial I will show you how you can migrate your VCSA instance to Proxmox.
Let's waddle through it!
First thoughts
Beware: The following tutorial is based on a real existing example which values, especially XML code values, can slightly differ in your personal environment. Please find out for your own environment which XML code lines you have to adjust according to your personal settings!
Start of tutorial
Here are the steps to go:
- Export the whole VM from the ESXi web client, which will get you a couple of virtual disks (16 disks in my case) and a
.ovffile, which contains the whole VM settings in XML format. - Copy everything temporarly over to a local storage directory (in my case the root user's home directory
/root) on the Proxmox host, for example via WinSCP (Don't delete the files yet from your local computer after copying over, as you will still need some of the virtual disk files later!). - Now you have to do some preparation before the migration process: vCenter's default SCSI controller LSI logic parallel has a limitation of 15 virtual disk capability, but as already mentioned, vCenter 7 has more than 15 virtual disks attached to it, as shown in the following screenshot:
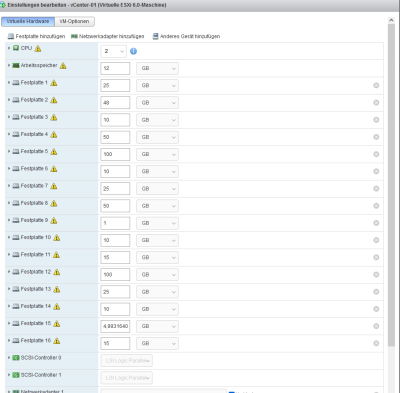 Amount of VCSA 7's VMDKs
Therefore it has a second SCSI controller configured by default. The Proxmox import command on the other hand comes into stuggle when the original VM's virtual disks are attached to different SCSI controllers: As soon as the migration process reaches a virtual disk attached to a different SCSi controller, it will abort and result in the following error message:
error during import, cleaning up created resources…import failed - cowardly refusing to overwrite existing entry: scsi0
To prevent this issue, you have to exclude the virtual disks attached to the additional SCSI controller from the automated migration process by outcommenting everything related to those disks within the.ovffile (don't worry, we will import the remaining virtual disks later manually!). Technically it would not matter which SCSI controller's virtual disks you decide to exclude from the automated migration process, but obviously it would make sense to exclude the virtual disks from the SCSI controller which has the less amount of virtual disks attached to it as the automated migration process will leave you with less manual work afterwards. In other words: You have to check which of the two SCSI controllers has the lower amount of virtual disks attached to it and exclude those ISCSI controller's virtual disks from the automated migration process. You can check manually by using the ESXi web client which virtual disks are attached to which of the SCSI controllers:
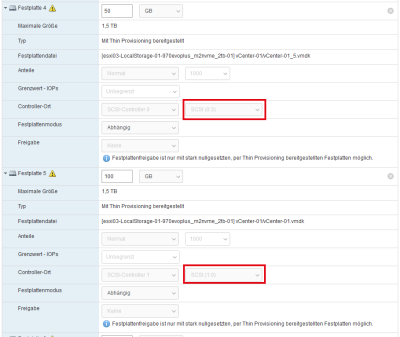
You can see on the screenshot above:
Virtual disk Nº 4 is attached on port Nº 3 of SCSI controller Nº 0
and
virtual disk Nº 5 is attached on port Nº 0 of SCSI controller Nº 1.
After checking all virtual disks, in my case, I found out that SCSI controller Nº 0 had 14 virtual disks and SCSI controller Nº 1 had 2 virtual disk attached to them. So I decided to exclude SCSI controller Nº 1 its two virtual disks (virtual disk Nº 5 and virtual disk Nº 11 in my case) from the automated migration process.
To do so, start a Proxmox command line session, open the according.ovffile and look out for the according virtual disk entries of virtual disk Nº 5 and virtual disk Nº 11, which in my case were the following two XML code sections:<Item> <rasd:AddressOnParent>0</rasd:AddressOnParent> <rasd:ElementName>Hard Disk 5</rasd:ElementName> <rasd:HostResource>ovf:/disk/vmdisk5</rasd:HostResource> <rasd:InstanceID>14</rasd:InstanceID> <rasd:Parent>3</rasd:Parent> <rasd:ResourceType>17</rasd:ResourceType> <vmw:Config ovf:required="false" vmw:key="backing.writeThrough" vmw:value="false"/> </Item>
and
<Item>
  <rasd:AddressOnParent>1</rasd:AddressOnParent>
  <rasd:ElementName>Hard Disk 11</rasd:ElementName>
  <rasd:HostResource>ovf:/disk/vmdisk11</rasd:HostResource>
  <rasd:InstanceID>20</rasd:InstanceID>
  <rasd:Parent>3</rasd:Parent>
  <rasd:ResourceType>17</rasd:ResourceType>
  <vmw:Config ovf:required="false" vmw:key="backing.writeThrough" vmw:value="false"/>
</Item>
Now the important entries on both XML sections from above are the following:
•<rasd:HostResource>ovf:/disk/vmdisk5</rasd:HostResource>
•<rasd:HostResource>ovf:/disk/vmdisk11</rasd:HostResource>
•<rasd:Parent>3</rasd:Parent>→ These are the matching entries which refer to theInstanceIDof the SCSI controller the virtual disk is attached to.Note
Not too relevant, but still for your information: In my case, the SCSI controllers in the ESXi Web UI were somehow numbered the other way round than they were within the exported.ovffile. In other words: SCSI controller Nº 0 in the ESXi Web UI was SCSI controller Nº 1 within the.ovffile and vice versa.Nice! Now based on the information we collected above let's move on and do an outcomment as follows on all relevant XML sections/entries, which in my case were the following (I won't explain too much at this point, please check by yourself why I have outcommented the according specific XML sections/lines, take a minute and you'll get the idea!) :
<!-- <File ovf:href="vCenter-01-4.vmdk" ovf:id="file5" ovf:size="0"/> -->and
<!-- <File ovf:href="vCenter-01-10.vmdk" ovf:id="file11" ovf:size="0"/> -->and
<!-- <Disk ovf:capacity="100" ovf:capacityAllocationUnits="byte * 2^30" ovf:diskId="vmdisk5" ovf:fileRef="file5" ovf:format="http://www.vmware.com/interfaces/specifications/vmdk.html#streamOptimized"/> -->and
<!-- <Disk ovf:capacity="15" ovf:capacityAllocationUnits="byte * 2^30" ovf:diskId="vmdisk11" ovf:fileRef="file11" ovf:format="http://www.vmware.com/interfaces/specifications/vmdk.html#streamOptimized"/> -->and
<!--
<Item>
  <rasd:Address>1</rasd:Address>
  <rasd:Description>SCSI Controller</rasd:Description>
  <rasd:ElementName>SCSI Controller 1</rasd:ElementName>
  <rasd:InstanceID>3</rasd:InstanceID>
  <rasd:ResourceSubType>lsilogic</rasd:ResourceSubType>
  <rasd:ResourceType>6</rasd:ResourceType>
  <vmw:Config ovf:required="false" vmw:key="slotInfo.pciSlotNumber" vmw:value="32"/>
</Item>
-->
and
<!--
<Item>
  <rasd:AddressOnParent>1</rasd:AddressOnParent>
  <rasd:ElementName>Hard Disk 11</rasd:ElementName>
  <rasd:HostResource>ovf:/disk/vmdisk11</rasd:HostResource>
  <rasd:InstanceID>20</rasd:InstanceID>
  <rasd:Parent>3</rasd:Parent>
  <rasd:ResourceType>17</rasd:ResourceType>
  <vmw:Config ovf:required="false" vmw:key="backing.writeThrough" vmw:value="false"/>
</Item>
-->
and
<!--
      <vmw:ExtraConfig ovf:required="false" vmw:key="SCSI1:0.ctkEnabled" vmw:value="TRUE"/>
      <vmw:ExtraConfig ovf:required="false" vmw:key="SCSI1:1.ctkEnabled" vmw:value="TRUE"/>
-->
Now safe the file, quit the editor and start the migration process by executing:
qm importovf <VM_ID> <path_to_OVF> <Proxmox_destination_storage>
Working example:
qm importovf 100 /root/vCenter-01.ovf local-lvm
Now be patient as the migration process can quite take a while. It will create a new VM based on the information within the
.ovffile and migrate the virtual disks in RAW format. - In the meantime, on your local computer, you can start to convert the from the migration process excluded disks manually, for example by using the Starwind V2V converter tool (That's the reason why you should still have kept the virtual disks files on your local computer as mentioned initially!). To keep things consistent, you should convert the remaining virtual disks also as a RAW destination format (After conversion feel free to rename the converted virtual disk files accoridng to the virtual disk file names which were generated by the automated Proxmox migration process.). Then copy the converted virtual disk files temporarly over to a local storage directory (in my case the root user's home directory
/root) on the Proxmox host, for example via WinSCP. Now start a command line session on the Proxmox host and import those virtual disks one by one into the already existing VM by executing the following command:
qm importdisk <VM_ID> <path_to_RAW_virtual_disk> <Proxmox_destination_storage>
Working example:
qm importdisk 100 /root/vCenter-01-10 local-lvm
After successfully importing the virtual disks, they should appear as
Unusedin the VM hardware settings on the Proxmox GUI:
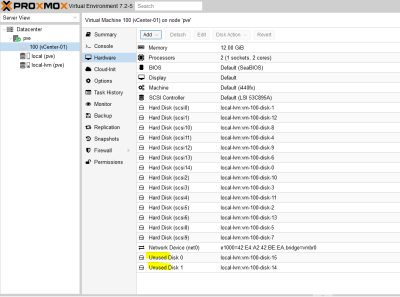 "Unused" virtual disks
To attach them to the according SCSI controller just double click theUnusedvirtual disks and configure them as required.
That's it! All virtual disks should have been migrated successfully now. Now before firing up your VM make sure you have configured the according VM's virtual CD-ROM and virtual NIC as you had it configured before on your ESXi host.Note
On first boot, in my case, the VM did start to boot but aborted with a "CPU timeout" or similiar error message after a few seconds. I then forced the VM to power off, changed the BIOS fromDefault (SeaBIOS)toOVMF (UEFI), then back toDefault (SeaBIOS), started the VM again and voilà, it booted up successfully! I am totally unsure why this problem appeared and I don't know if it has something to do with the VM's BIOS settings, maybe it would have been enough to just power off and power on the VM again without making any BIOS changes, I just wanted this to mention here.


End of tutorial
Appreciate my work?
Buy me a coffee  or PayPal
Source(s):
https://pve.proxmox.com/wiki/Migration_of_servers_to_Proxmox_VE#Virtual-to-Virtual_.28V2V.29
https://forum.proxmox.com/threads/how-to-add-vm-from-raw-file-stored-on-disk.80391/
https://dae.me/blog/2340/how-to-add-an-existing-virtual-disk-to-proxmox/
